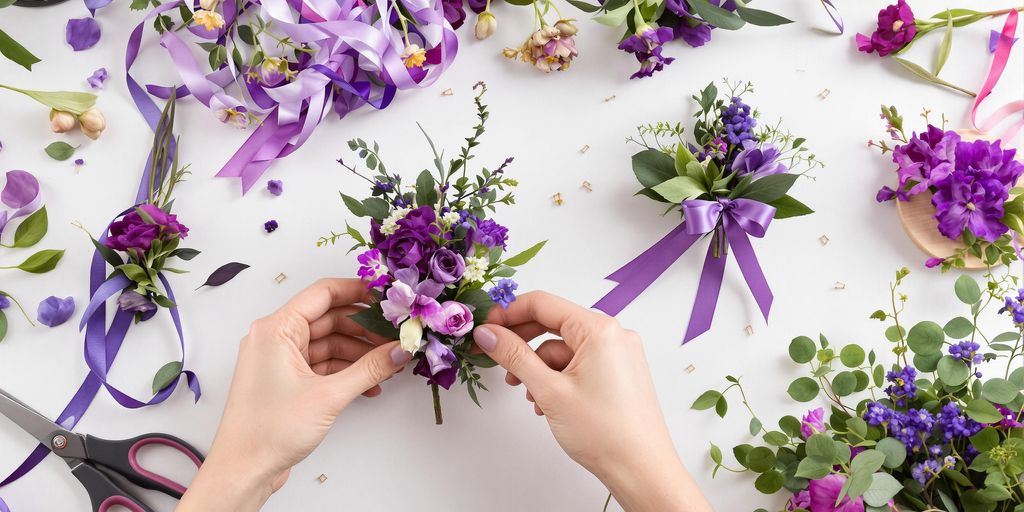
Prom is a special occasion, and what better way to stand out than with a beautiful purple corsage and boutonniere? Making these floral accessories yourself can be a fun and creative project. Plus, it adds a personal touch that store-bought options just can’t match. In this guide, we’ll walk you through the steps on how to make a purple corsage and boutonniere for prom 2025, ensuring you have everything you need to impress your date and friends.
Key Takeaways
- Gather all necessary supplies like scissors, floral tape, and ribbon.
- Choose flowers that complement each other in shades of purple.
- Secure your flowers with floral tape for stability.
- Wrap your creations in ribbon for a polished look.
- Don’t forget to personalize with unique touches or decorative elements.
Gathering Your Supplies for Corsage and Boutonniere

Essential Tools for Your Project
Okay, so you’re diving into making your own corsage and boutonniere? Awesome! First things first, you gotta gather your tools. It’s like prepping for a cooking show, but with flowers. Having everything ready before you start will make the whole process way smoother. Here’s a quick rundown of what you’ll need:
- Sharp scissors or floral shears: Don’t even think about using your kitchen scissors. You need something that can make clean cuts without crushing the stems.
- Floral tape: This stuff is your best friend. It’s sticky, stretchy, and helps hold everything together. Get the green kind – it blends in better.
- Ribbon: Pick something that matches your flowers and the overall vibe. Satin, grosgrain, or even a cool textured ribbon can add a lot.
- Wire cutters (optional): If you’re using floral wire for extra support, these will come in handy.
- Hot glue gun (optional): For attaching embellishments or securing ribbon, but be careful not to burn your fingers!
- Corsage wristlet or boutonniere pins: Depending on whether you’re making a wrist corsage or one that pins on, you’ll need the right attachment method.
Choosing the Right Flowers
Now for the fun part: flowers! Think about the colors, textures, and overall style you’re going for. Are you matching a dress? Going for a rustic vibe? Here are some things to consider:
- Focal flower: This is your star. Roses, carnations, or even a small sunflower can work. Pick something that stands out.
- Filler flowers: These add volume and texture. Baby’s breath, statice, or wax flowers are great choices.
- Greenery: Don’t forget the greens! Leather leaf, ferns, or eucalyptus add a natural touch and fill in gaps.
- Color coordination: If you’re matching a dress, bring a swatch with you to the flower shop. Otherwise, think about complementary colors or a monochromatic scheme.
- Flower freshness: Make sure your flowers are fresh and perky. Avoid anything that looks wilted or bruised.
Selecting the Perfect Ribbon
The ribbon is like the jewelry of your corsage and boutonniere. It can add a pop of color, texture, and personality. Here’s how to pick the perfect one:
- Material: Satin ribbon is classic and elegant, while grosgrain is more casual and textured. Velvet ribbon can add a luxurious touch.
- Width: A wider ribbon can make a statement, while a thinner ribbon is more subtle. Consider the size of your flowers and the overall design.
- Color: Match the ribbon to your flowers, the dress, or the event’s theme. You can also use a contrasting color for a pop.
- Length: Make sure you have enough ribbon to wrap the stems and tie a bow (if you want one). It’s always better to have too much than not enough.
- Embellishments: Consider adding beads, pearls, or other embellishments to your ribbon for extra sparkle.
Preparing Your Flowers and Greens
Cutting Your Stems
Alright, so you’ve got your flowers and greenery all picked out. Now what? First things first, you gotta cut those stems. I usually go for about 1.5 to 2 inches. This makes them easier to work with when you’re assembling the corsage or boutonniere. Think of it like prepping your ingredients before you start cooking – you wouldn’t throw a whole potato into a stew, right? Same idea here. Shorter stems give you more control and a cleaner look.
Removing Leaves for a Clean Look
Next up: leaf removal. Seriously, strip those stems bare for the bottom half inch or so. You don’t want any leaves getting in the way when you’re taping everything together. Plus, leaves tend to wilt faster than the flowers, and you don’t want a droopy leaf ruining your masterpiece. Trust me, a clean stem is a happy stem. This step is super important for a professional look.
Choosing Focal and Filler Flowers
Okay, so you’ve got your stems cut and cleaned. Now it’s time to think about the overall design. You’ll want to pick out your focal flower – the star of the show. Then, choose some filler flowers and greenery to complement it. I like to use at least two different types of filler to add some texture and depth. Here’s a quick guide:
- Focal Flower: Rose, carnation, or any bloom that grabs attention.
- Filler Flower 1: Baby’s breath, statice, or similar delicate options.
- Filler Flower 2: Something with a bit more texture, like waxflower or limonium.
- Greenery: Eucalyptus, ferns, or any leafy accent to add some freshness.
Think about color too! Do you want a monochromatic look, or something with more contrast? Play around and see what looks best to you. Don’t be afraid to experiment!
Creating the Corsage Design
Starting with Your Focal Flower
Okay, so you’ve got all your flowers prepped and ready to go. Now comes the fun part: actually making the corsage! Start with your focal flower; it’s the star of the show. Gently hold it in your non-dominant hand. Then, take a couple of pieces of your chosen greenery and position them behind the focal flower. Think of it like framing the main attraction. Use floral tape to secure the stems together nice and tight. This creates the base for everything else you’re going to add. Make sure the tape is snug, but not so tight that you crush the stems.
Layering Greenery and Fillers
Time to build up the layers! This is where you get to play around with textures and colors. Add in your filler flowers around the focal flower and greenery. Think about how the colors and shapes complement each other. Don’t be afraid to experiment! I usually go for an odd number of filler flowers – like three or five – because it tends to look more balanced to my eye. Secure each layer with floral tape as you go. You want everything to be held together well, but still look natural and not too stiff. This part is all about building the corsage design to your liking.
Adding Decorative Elements
Alright, the flowers are in place, and it’s looking pretty good! Now, let’s add some extra flair. This could be anything from small ribbons to delicate beads or even a touch of glitter (if you’re feeling extra!). I like to use ribbon that matches the color of the dress or suit it’s going to be worn with. A small bow tucked in among the flowers can add a really nice touch. Again, secure everything with floral tape or a dab of floral glue, depending on what you’re using. Just remember, a little goes a long way – you don’t want to overwhelm the flowers. This is where you can really let your personality shine through and make the corsage truly unique.
Assembling the Boutonniere
Securing the Flowers Together
Okay, so you’ve got your flowers prepped and ready to go. Now comes the fun part: actually putting the boutonniere together. Start by holding your focal flower in one hand. Then, carefully arrange your greenery and filler flowers around it. The key here is balance; you don’t want it to look lopsided. Use floral tape to bind the stems together tightly, starting close to the flower heads and working your way down. Make sure it’s secure, but don’t crush the stems!
Adding a Bow for Style
Time to add a little flair! A bow can really elevate the look of your boutonniere. Choose a ribbon that complements your flowers – maybe a satin or grosgrain ribbon in a matching or contrasting color. There are a bunch of ways to tie a bow, from simple loops to more elaborate designs. I usually go for a classic single loop bow. Attach it right below the flower heads using floral wire or by carefully gluing it in place. Make sure the bow is secure and doesn’t overwhelm the flowers.
Finishing Touches with Ribbon
Almost there! Now, let’s cover up that floral tape. Starting at the top of the taped area, carefully wrap the ribbon around the stems, overlapping slightly as you go. This gives it a clean, polished look. When you reach the bottom, secure the ribbon with floral glue or by tucking the end under a wrap. You can also use a pearl-headed pin to hold it in place. Trim any excess ribbon for a neat finish. And there you have it – a stylish boutonniere ready for prom!
Techniques for Taping and Wrapping
Using Floral Tape Effectively
Okay, so floral tape can be a bit tricky, but once you get the hang of it, it’s a lifesaver. The key is to stretch it as you wrap. This activates the adhesive and makes it stick to itself. Don’t just wrap it loosely; give it a good tug. Start above where you want the tape to end, and overlap as you go down the stems. This ensures a secure hold. Think of it like wrapping an ace bandage – you want it snug but not too tight. For example, when you secure with tape around the wire and stem, make sure to stretch the tape for better adhesion.
Wrapping with Ribbon
Wrapping with ribbon is where you can really add some style. After you’ve taped everything, start at the base of the taped stems. Use a dab of hot glue to keep the ribbon in place. Then, carefully wrap upwards, overlapping slightly with each turn. Keep the tension even so you don’t get any weird bumps or gaps. When you reach the top, secure the ribbon with another dab of glue and trim any excess. You can also use pearl headed pins to secure the ribbon. Here’s a quick guide:
- Start at the base of the taped stems.
- Overlap the ribbon slightly with each turn.
- Keep the tension even.
- Secure with glue or pins at the top.
Ensuring Stability and Style
The goal here is to make sure your corsage or boutonniere not only looks good but also stays together. Use enough tape and ribbon to provide a solid base, but don’t overdo it. Too much tape can make it bulky and awkward. Consider using wire to reinforce delicate stems before taping. This will give them extra support and prevent them from bending or breaking. Also, think about the color of your tape and ribbon. You want them to complement your flowers, not clash with them. For example, you can add decorative elements like ribbon or twine for a polished finish.
Attaching the Corsage and Boutonniere
Using Wristlets for Corsages
Okay, so you’ve made this beautiful corsage, now how do you actually wear it? Most of the time, corsages are attached to a wristlet. These are basically fancy bracelets designed to hold flowers. Make sure the wristlet fits comfortably but snugly. You don’t want it sliding all over the place, but you also don’t want it cutting off circulation! Secure the corsage to the wristlet using floral wire or strong adhesive, making sure it’s stable. I usually give it a little shake test to be sure it won’t fall apart on the dance floor.
Pinning on the Boutonniere
Boutonnieres are usually pinned to the lapel of a jacket or shirt. Here’s the trick: you want the boutonniere to look like it’s floating naturally, not like it’s been attacked by pins.
- Position the boutonniere on the left lapel.
- Use boutonniere pins to secure it. Push the pin through the back of the lapel, catching some of the stem, and then back through the lapel.
- Use at least two pins for stability.
Tips for Secure Attachment
- Always test the pins on a hidden part of the fabric first to make sure they don’t leave marks.
- For delicate fabrics, consider using magnetic boutonniere holders instead of pins.
- If the corsage feels too heavy for the wristlet, reinforce it with extra floral wire or consider a different style of wristlet.
Personalizing Your Floral Arrangements
Incorporating Unique Elements
Okay, so you’ve got the basics down. Now’s the time to really make these corsages and boutonnieres yours. Think beyond just the standard roses and baby’s breath. What about feathers? Small charms? Even tiny, lightweight photographic elements if you’re feeling bold? The key is to choose things that reflect the wearer’s personality or the theme of the prom. For example, if someone loves music, maybe incorporate a tiny treble clef charm. If they’re into a specific hobby, find a subtle nod to it. It’s all about those little details that make a big impact.
Color Coordination Tips
Color is everything! Don’t just think about matching the prom dress; consider the overall aesthetic. Here’s a quick guide:
- Complementary Colors: These are opposite each other on the color wheel (like purple and yellow). They create a vibrant contrast.
- Analogous Colors: These are next to each other on the color wheel (like purple, blue-purple, and blue). They create a harmonious, blended look.
- Monochromatic: Different shades of the same color (various purples, from lavender to deep violet). This is elegant and sophisticated.
Also, think about skin tone and hair color. Certain colors will pop more on some people than others. And don’t be afraid to use metallic accents – gold or silver can add a touch of glam.
Adding Personal Touches
This is where you can really let your creativity shine. Consider these ideas:
- Initials: Use wire or beads to create the wearer’s initials and incorporate them into the design.
- Birthstones: Add a small birthstone charm for a meaningful touch.
- Favorite Flowers: Even if they don’t perfectly match the color scheme, including a favorite flower shows you put thought into it.
- Ribbon Messages: Print a short, sweet message on the ribbon. It could be a quote, a date, or just a simple “Have fun!”
Remember, the goal is to create something that’s not just pretty, but also meaningful and memorable. These [DIY combo pack]s are a great way to start, but the personal touches are what will truly make your corsage and boutonniere stand out.
Troubleshooting Common Issues
Dealing with Wilting Flowers
Okay, so you’ve put in all this effort, and now your flowers are starting to look a little sad? Don’t panic! The first thing to do is give them a drink. I usually recut the stems at an angle under water – this helps them take up water better. Then, I’ll put them in a cool room, away from direct sunlight. Sometimes, a little flower food in the water can work wonders. If it’s just a few petals, you can carefully trim them off to keep the corsage or boutonniere looking fresh for a bit longer.
Fixing Loose Stems
Loose stems can be a real pain, but they’re usually easy to fix. If a stem is wobbly, try gently pushing it back into place and securing it with more floral tape. Make sure the tape is pulled tight as you wrap it. If the stem is completely detached, you might need to use a bit of floral glue to reattach it. Hold it in place until the glue sets. I’ve found that using a toothpick to apply the glue precisely can be really helpful.
Adjusting for Size and Shape
Sometimes, the corsage or boutonniere just doesn’t look quite right. Maybe it’s too big, too small, or the shape is off. Don’t be afraid to make adjustments! If it’s too big, carefully remove some of the filler flowers or greenery. If it’s too small, you can add more. To adjust the shape, gently bend the stems or reposition the flowers until you’re happy with the overall look. It’s all about playing around until you get it just right.
Exploring Different Styles and Trends
Prom corsages and boutonnieres have come a long way! It’s not just about the standard rose anymore. Let’s check out some cool ideas to make your floral accessories pop.
Current Trends in Corsages and Boutonnieres
So, what’s hot right now? Think less traditional and more personalized. People are moving away from the super formal look and embracing styles that show off their personality. Here’s a quick rundown:
- Boho Chic: Think wildflowers, earthy tones, and flowing ribbons. It’s all about that relaxed, natural vibe.
- Classic Elegance: Still a favorite! Roses, lilies, and a touch of sparkle never go out of style. But even classic can be updated with modern ribbon choices.
- Bold and Colorful: Don’t be afraid to go bright! Think rainbow colors, or even just a single, striking hue that complements your outfit.
Mixing Textures and Colors
One of the easiest ways to make your corsage or boutonniere stand out is by playing with different textures and colors. Try these ideas:
- Combine smooth satin ribbons with rougher burlap for an interesting contrast.
- Mix different types of flowers, like delicate baby’s breath with bolder carnations.
- Use greenery with varied leaf shapes and sizes to add depth.
Inspiration from Recent Events
Keep an eye on what celebrities are wearing to awards shows and other big events. You can often find cool ideas for color palettes, flower choices, and overall design. Also, check out what’s trending on social media – floral designers are always posting their latest creations. For example, Peach Fuzz is a trending color right now, so incorporating that into your design could be very stylish!
Caring for Your Corsage and Boutonniere
Keeping Flowers Fresh
Okay, so you’ve poured your heart and soul into crafting these amazing corsages and boutonnieres. Now, how do you keep them from looking sad before the big event? The key is hydration and cool temperatures. I usually spritz mine with a little water and store them in the fridge. Not the freezer, obviously! Think of it like giving them a mini spa day before their debut. Here’s a quick rundown:
- Mist the flowers lightly with water.
- Store in the refrigerator (not freezer!) in a sealed container or plastic bag.
- Avoid placing them near fruits, as they release ethylene gas, which can speed up wilting.
Storage Tips Before the Event
Proper storage is super important. You don’t want to end up with droopy flowers right before prom! I’ve found that the crisper drawer in the fridge works wonders. Just make sure to keep them away from anything heavy that could crush them. Also, a little tip: add a slightly damp paper towel to the bag or container to maintain humidity. This helps keep the flowers fresh and perky. Here’s a table to help you visualize:
| Storage Method | Temperature | Humidity | Notes |
|---|---|---|---|
| Refrigerator (Crisper) | 35-40°F (2-4°C) | High | Keep away from fruits and heavy items |
| Sealed Container | Same as refrigerator | High | Add damp paper towel for extra moisture |
Handling During the Event
Alright, the big night is here! Now, it’s all about gentle handling. Tell whoever’s wearing the boutonniere to avoid squishing it during hugs (easier said than done, I know!). For the corsage, make sure the wristlet isn’t too tight, as that can damage the flowers. And if it’s a pin-on corsage, double-check that it’s securely fastened to prevent any embarrassing flower-dropping moments on the dance floor. A little care goes a long way in keeping those floral arrangements looking their best throughout the night.
Sharing Your Creations
Documenting Your DIY Process
Okay, so you’ve made this awesome corsage and boutonniere. Don’t just let it sit there! Grab your phone and start snapping pics. Seriously, future you will thank you. Think about it: a quick video showing how you wrapped the ribbon, close-ups of the flower arrangement, and maybe even a shot of you wearing the finished product. It’s not just about showing off; it’s about creating a record of your work. Plus, if you ever want to make another one, you’ll have something to look back on. I wish I had done this when I tried making a floral crown last year – total fail, but at least I’d have a funny video to remember it by.
Social Media Tips for Sharing
Alright, you’ve got your photos and videos. Now what? Time to unleash them on the world! But hold on, don’t just dump them online without a plan. Think about your captions. Instead of just saying “Here’s my corsage,” try something like, “DIY prom corsage 2025! What do you think?” Use relevant hashtags like #promcorsage, #DIYflowers, #prom2025, and #flower arrangement. Tag the people who helped you, or even the flower shop where you got your supplies. And don’t forget to ask for feedback! The more engagement you get, the more people will see your creation. Consider sharing across multiple platforms – Instagram, TikTok, even Pinterest if you’re feeling fancy.
Creating a Floral Portfolio
If you’re seriously into making floral arrangements, consider putting together a portfolio. This doesn’t have to be anything super formal – a simple online album or even a dedicated Instagram account will do. The point is to have a place where you can showcase all your creations in one spot. This is especially useful if you’re thinking about doing this kind of thing professionally, even just for friends and family. A portfolio lets people see your range and skill. Plus, it’s a great way to track your progress and see how far you’ve come. Think of it as your floral resume! You can even include details about each project, like the types of flowers you used, the techniques you tried, and any challenges you overcame. It’s all about showing off your DIY flower skills!
Why DIY Corsages and Boutonnieres Matter
The Significance of Personal Touches
There’s something really special about a handmade corsage or boutonniere. It’s not just about saving money; it’s about adding a personal touch that store-bought items simply can’t match. Think about it – you get to choose the exact flowers, colors, and style to perfectly complement the outfit and the event. It shows you put in the effort, and that means a lot. It’s a way to make the occasion even more memorable.
Cost-Effective Solutions
Let’s be real, prom and wedding expenses add up fast. Buying pre-made floral arrangements can be surprisingly expensive. DIY-ing your corsage and boutonniere is a great way to cut costs without sacrificing style. You can get creative with budget-friendly flowers and materials, and still end up with something beautiful. Plus, you control exactly how much you spend.
Building Skills for Future Events
Learning to make a corsage and boutonniere isn’t just a one-time thing. It’s a skill you can use for all sorts of future events. Graduations, dances, even just a fancy dinner – you’ll be able to whip up a custom floral piece in no time. It’s a fun and useful skill to have, and who knows, maybe you’ll even start making them for friends and family!
Wrapping It Up
So there you have it! Making a purple corsage and boutonniere for prom is totally doable, even if you’re not a pro at flower arranging. Just follow the steps, take your time, and don’t stress too much about getting everything perfect. Remember, it’s all about adding your own touch and having fun with it. Plus, you’ll save some cash by doing it yourself, and it’ll mean a lot more to the person wearing it. Now that you know how to create these beautiful pieces, you’re all set to shine at prom 2025!
Frequently Asked Questions
What materials do I need to make a corsage and boutonniere?
You will need scissors, floral tape, ribbon, and either a wristband or pins.
How do I choose the right flowers?
Pick flowers that match your color theme. Consider using a mix of focal flowers and fillers to create a balanced look.
What is the best way to cut the flower stems?
Cut the stems to about 1.5 inches long for easy handling and arrangement.
How do I make sure my flowers stay fresh?
Keep them in water until you’re ready to use them, and avoid exposing them to heat.
Can I personalize my corsage and boutonniere?
Yes! You can add unique elements like charms or special colors to make them your own.
What if the flowers start wilting before prom?
If they wilt, you can try to rehydrate them by putting the stems in water again for a few hours.
How do I attach the corsage to a wristband?
Secure it using the attached strings or use floral tape to fasten it to the wristband.
Is making a corsage and boutonniere difficult?
Not at all! With a little practice and following the steps, you can create beautiful arrangements.